Thursday, December 23, 2021

New Paper: Speech Naturalness Recognition

Abstract

This study proposes an automatic naturalness recognition from an acted dialogue. The problem can be stated that: given speech utterances with their naturalness labels, is it possible to recognize these labels automatically? By what methods? And how to evaluate these methods? We evaluated two supervised classifiers to investigate the possibility of recognizing naturalness automatically in acted speech: long short-term memory and multilayer perceptron neural networks. These classifiers accept inputs in the form of acoustic features from a speech dataset. Two kinds of acoustic features were evaluated: low-level and high-level features. This initial study on automatic naturalness recognition of speech resulted in a moderate performance of the assessed systems. We measured the performance in concordance correlation coefficients, Pearson correlation coefficients, and root mean square errors. This study opens a potential application of speech processing techniques for measuring naturalness in acted dialogue, which benefits for drama- or movie-making in the future.

Illustration (of potential application):


(best) Result

Metric: concordance + Pearson correlation coefficient (CCC, PCC), [root] mean square error ([R]MSE)
Method; Multilayer perceptron (MLP) with high-level statistical functions (HSF)
Interpretation: intermediate result (CCC)


Full paper + Code

Wednesday, October 27, 2021

Benchmarking SSD: Micron 5300

This is a benchmark report for the biggest size ever SSD I used, two 8TB Micron 5300. For simplicity, I only conducted a benchmark on a single disk with XFS and EXT4 filesystem.

Name: Micron 5300 MTFD

Capacity: 8 TB (7.7TB)

Link: https://www.micron.com/products/ssd/product-lines/5300

Other specs:


Result

EXT4


XFS


(Partial) conclusion

XFS filesystem seems faster (531 MBps read) and more stable than EXT4.

Thursday, October 21, 2021

Argumen "self" pada Python OOP (temasuk __init__ dan instance variable)

Saat pertama kali mengetahui banyaknya kata "self" pada bahasa pemrograman Python, saya terhenyak. Teknik ini banyak sekali dipakai (a must!), dan saya sama sekali tidak memahaminya. Dua tahun lebih berlalu sejak saya ingin mengenal "self" pada Python (2019-02-02), dan kali ini saya ingin serius berkenalan dengannya.

"Kelas" dan OOP

Bahasa pemrograman python diadopsi secara meluas karena keluwesannya, baik secara prosedural maupun object-oriented programming (OOP). Pada kasus pertama, yakni prosedural, cukup sederhana dan intuitif. Misal:

def kali(x, y):
    return x*y

Secara singkat kita bisa paham bahwa "kali" adalah sebuah fungsi untuk mengalikan dua variabel, x dan y. Hal ini berbeda dengan kelas berikut

class kaliX (object):
    def __init__(self, data):
        self.data = int(data)
    def kali(self, other):
        return self.data * other.data
Disinilah saya kebingungan memahami apa itu self. Kembali ke dua potongan kode di atas. Kalau kita run di IPython, akan terlihat hasilnya sama sebagai berikut (hanya terlihat ketika mengakses blog ini via PC).


Jadi apa itu self?

Sebelum masuk ke self, kita masuk ke __init__ dulu karena __init__ disebut lebih dulu pada OOP, pada contoh di atas. __init__ adalah inititalization method pada badan OOP atau kelas. Fungsi pertama kelas ini, yakni didefinisikand dengan def __init__ akan dipanggil setiap instance dari kelas dibuat. Instance sederhananya ya kelas itu sendiri. Nah self adalah variabel pertama dari fungsi __init__. Variabel kedua fungsi __init__ adalah `data`. Berbeda dengan bahasa pemrograman lain (yang saya juga tidak mengerti), Python mengizinkan satu __init__ saja pada satu kelas [3].


Instance Variable

Sebagai tambahan dari self dan __init__ adalah `instance variable`. Instance variable adalah DASAR dari OOP dalam Python. Dalam contoh kelas "kaliX" di atas, instance variable-nya adalah sebagai berikut: `data` pada `self.data`. Maknanya, variabel data sebagai input kelas kaliX akan diubah menjadi integer dan menempati tempat `data` pada `self.data`. Pada fungsi `kali` yang menjadi bagian dari kelas `kaliX`, variabel `other` akan menempati `data` pada `other.data` melalui fungsi __init__ tadi. Begitu seterusnya jika ada variabel lain. Beginilah secara sederhana OOP bekerja. Instance variable bisa diisi secara eksplisit lewat `Namakelas.NamaInstanceVariable  = <nilai>`. Misalnya `my_circle.radius = 5` pada contoh berikut.

>>> class Circle:
         def __init__(self):
             self.radius = 1
    
>>> my_circle = Circle()
>>> print(my_circle.radius)
>>> 1
>>> my_circle.radius = 5
>>> print(my_circle.radius)
>>> 5


Kesimpulan

Telah dikelaskan apa itu __init__  -- sebagai fungsi initial di kelas --, self --sebagai argumen pertama __init__ --, dan instance variable -- sebagai dasar OOP di Python --.


Referensi:

  1. https://www.programiz.com/article/python-self-why
  2. https://www.digitalocean.com/community/tutorials/how-to-construct-classes-and-define-objects-in-python-3
  3. Naomi Ceder, The Quick Python Book, 2nd ed. Manning Publishing, 2018.

Thursday, October 14, 2021

Benchmarking HDD: HGST (G-Tech) vs. Seagate

Sebelum membaca artikel ini ada baiknya membaca benchmark saya sebelumnya, HDD vs SSD.

HDD 1: G-Technology 0G06071

Link: Amazon Japan

Spec


Hasil

Ext4


NTFS


HDD2: Seagate Expansion 5 TB

Link: Amazon Japan

Spec


Hasil

NTFS


Kesimpulan:

  • Ekstensi Ext4 secara umum lebih cepat (read rate) dan lebih stabil (kurva flat) daripada NTFS
  • HGST lebih cepat daripada Seagate (?)

Tuesday, October 12, 2021

Data Hiking 2020 - 2021

Data berikut merupakan ringkasan aktivitas pendakian saya satu tahun (2020-2021) yang diambil dari yamap. Untuk apa data ini? Untuk dokumentasi saya pribadi dan juga sebagai data pembanding dikemudian hari. 

Data Jumlah Gunung

Data jarak (km) per bulan

Data elevasi gain per bulan

Data jumlah hari pendakian per bulan

Data kalori per bulan

Lokasi pendakian (warna biru)


Ringkasan 

Terakhir adalah ringkasan aktivitas pendakian setahun. Bulan September 2020 dan Augustus 2021 saya tidak melakukan aktivitas pendakian.

Tuesday, October 05, 2021

Installing Tensorflow 1.15 in RTX3090 with GPU support

This note also reported a configuration that enables multiple Cuda version installations in a single OS.

RTX 3090 with Cuda 11 is new (in the time of writing, 2021) but Tensorflow 1.15 is old. These two kinds of software aren't compatible with each other since software development usually follows the latest updates. Hence it is cumbersome to install Tensorflow 1.15 in the new Cuda and GPU version. Why still use TF 1.15? Some of my research, particularly with multi outputs scenarios, aren't working well in TF2. Instead, it works smoothly in TF1. Here is how I installed TF1.15 with GPU support on the new Cuda 11 with RTX 3090.

Before going into the installation process, here is the result that I have at the end; it shows my hardware.
In[1]: import tensorflow as tf
In [2]: tf.__version__
Out[2]: '1.15.4'

In[3]: tf.test.is_gpu_available()
...
2021-10-05 11:47:26.465074: I tensorflow/core/common_runtime/gpu/gpu_device.cc:1351] Created TensorFlow device (/device:GPU:0 with 22362 MB memory) -> physical GPU (device: 0, name: NVIDIA GeForce RTX 3090, pci bus id: 0000:c1:00.0, compute capability: 8.6)
2021-10-05 11:47:26.469313: I tensorflow/compiler/xla/service/service.cc:168] XLA service 0x558ebc9d6310 initialized for platform CUDA (this does not guarantee that XLA will be used). Devices:
2021-10-05 11:47:26.469331: I tensorflow/compiler/xla/service/service.cc:176]   StreamExecutor device (0): NVIDIA GeForce RTX 3090, Compute Capability 8.6
Out[3]: True

In this setup, I used python 3.7. You can change it accordingly.
# install appropriate conda, mine is Python 3.7, Linux
# see: https://docs.conda.io/en/latest/miniconda.html
wget https://repo.anaconda.com/miniconda/Miniconda3-py37_4.10.3-Linux-x86_64.sh
chmod +x 
./Miniconda3-py37_4.10.3-Linux-x86_64.sh

conda create --name TF1.15 python=3.7
conda activate TF1.15

pip install nvidia-pyindex
pip install nvidia-tensorflow[horovod]
pip install pytz

conda install -c conda-forge openmpi
export LD_LIBRARY_PATH=$LD_LIBRARY_PATH:$HOME/miniconda3/envs/TF1.15/lib/
Additional installation is needed from the OS side
 sudo apt install openmpi-bin
Finally, if you already installed cuda version 10 or 11 in your Ubuntu OS (installed in the system), it will not interfere with that installation since it is installed in (conda) virtual environment. It means that we have multiple cuda versions in a single OS.

In the end, using supercomputers like abci.ai will make life easier. No additional setup is needed, just use `module load`. But we need to pay even though we are employed by the same organization that operates the supercomputer.


Update 2022/03/28:  
I managed cannot install nvidia-tensorlow[horovod] via conda today. Instead, the following works.
conda create --name tensorflow-15 \
    tensorflow-gpu=1.15 \
    cudatoolkit=10.0 \
    cudnn=7.6 \
    python=3.6 \
    pip=20.0

Update 2022/03/29:

The aforementioned steps above now failed again due to a problem with the libclublas library. Although no error has been shown on the call of `tf.test.gpu_is_available()`, I faced an error when running code with TF 1.15. As a solution, I used docker as explained here (In the Indonesian language, right-click >> translate to English, if you use Chrome as a browser): 

Thursday, September 23, 2021

Gagal S3 karena tidak mau menyerahkan buku disertasi

Cerita berikut konyol namun menurut saya salah satu contoh idealisme terbaik. 

Dennis W. Ritchie, penemu bahasa C dan Unix gagal S3 karena tidak mau menyerahkan buku disertasinya ke perpustakaan Harvard University. Si penemu bahasa C tersebut sudah menyelesaikan semuanya tentang disertasinya, buku pun sudah, ujian juga sudah. Cuma satu, saat perpustakaan Harvard meminta buku disertasinya, dia menolaknya. Dia berujar, "Jika perpus mau disertasiku, ya beli...."


‘If the Harvard library wants a bound copy for them to keep, they should pay for the book, because I’m not going to!’


Tidak ada Ritchie artinya (mungkin) tidak ada Unix dan Bahasa C. Tidak ada Unix artinya tidak ada Linux, Windows, MacOS, dan Android, atau mungkin ada namun tidak secanggih sekarang. Di zaman yang modern ini, kita perlu menjaga idealisme hal-hal kecil seperti diatas. Logis sekali pernyataan Dennis Ritchie ini: Jika engkau menginginkan suatu barang, engkau harus membelinya.


Ketikan yang sempurna

Tambahan kecil di cerita disertasi Dennis Ritchie adalah ketikan yang mendekati sempurna. Di zaman yang belum ada komputer (dan dia sendiri yang menemukan/membangun komputer), hanya ada enam kesalahan tik dalam disertasinya. Padahal disertasinya sendiri berkaitan dengan matematika. Sangat sulit untuk membuat persamaan matematika yang sempurna dengan mesin tik. Saya mengalaminya saat SMP. Gambar di bawah adalah contoh ketikan disertasi Ritchie dari sumber [1].

Disertasi Ritchie, hanya 6 salah tik (typo) dalam 181 halaman [1]


Referensi:

[1] https://computerhistory.org/blog/discovering-dennis-ritchies-lost-dissertation/ 


Wednesday, September 22, 2021

Lebih baik mengundurkan diri daripada menginstall WA

Seorang teman berseloroh: dia lebih memilih untuk dipecat/mengundurkan diri dari pekerjaannya daripada diminta menginstall whatsapp (WA). Dan dia melakukannya. Dia mengundurkan dari posisi dosen PTN di wilayah barat Indonesia. Saya sependapat dengannya. 

Hidup ini pilihan, dan kadang tidak ada pilihan yang salah (dan selebihnya ada, salah memilih). Menjadi dosen itu pilihan baik, pekerjaan lain juga pilihan baik. Teman saya yang mundur gara-gara WA tadi juga tidak salah karena itu pilihannya. Pihak kampus yang memaksa teman saya menginstall WA tadi juga tidak salah karena itu wewenangnya. 

Ketika sudah bekerja kita harus mematuhi peraturan pekerjaan. Jika tidak bisa maka kita harus mundur, itulah konsekuensinya. Mundur juga bukan perbuatan tercela. Hal ini akan berbeda ketika kita bisa merubah kebijakan atau peraturan itu. 

Wallahua'lam bi showab.

Tulisan terkait:

Friday, September 10, 2021

Setting Up Huion WH1409 V2 on Ubuntu (20.04)

This is my second experience using a pen tablet on Ubuntu (which works wonderful). Everything works out the box using the previous Digimend v10 installation. The only change I made is to copy Huion H950p configuration to the following content.
#!/bin/sh
# huiowh1409.sh: configuration file for WH1409 on Ubuntu 20.04, run as: $ ./huionwh1409.sh

#Change DVI-I-1 to what monitor you want from running command: xrandr
MONITOR="DP-1"

# Get pad name, use "lsusb" or "xsetwacom list devices"
PAD_NAME='HUION Huion Tablet'

# get stylus ID
ID_STYLUS=$(xinput | grep "$PAD_NAME stylus" | cut -f 2 | cut -c 4-5)

# map pad to first monitor
xinput map-to-output $ID_STYLUS $MONITOR

# Pad button mapping for Xournal

xsetwacom set "$PAD_NAME Pad pad" button 1 key Ctrl z # undo
xsetwacom set "$PAD_NAME Pad pad" button 2 key Ctrl y # redo
xsetwacom set "$PAD_NAME Pad pad" button 3 key Ctrl shift d # default
xsetwacom set "$PAD_NAME Pad pad" button 8 key Ctrl shift p # pen

xsetwacom set "$PAD_NAME Pad pad" button 9 key Ctrl shift e # eraser
xsetwacom set "$PAD_NAME Pad pad" button 10 key Ctrl 1 # shape recognizer
xsetwacom set "$PAD_NAME Pad pad" button 11 key Ctrl 4 # arrow
xsetwacom set "$PAD_NAME Pad pad" button 12 key Ctrl 5 # coordinate

xsetwacom set "$PAD_NAME Pad pad" button 13 key Ctrl c # copy
xsetwacom set "$PAD_NAME Pad pad" button 14 key Ctrl v # paste
xsetwacom set "$PAD_NAME Pad pad" button 15 key Ctrl shift r # select rect 
xsetwacom set "$PAD_NAME Pad pad" button 16 key Ctrl d # new page after


exit 0
All 12 pad buttons work without any further configuration! Both USB cable and bluetooth connection also work seamlessly. This WH1409 tablet has a smoother pen (PW500 pen) compared to H950P (with PW100 pen). So far, I am very satisifed by its performance, particularly on Linux-based PC.

Wednesday, September 08, 2021

Etika Komunikasi Mahasiswa Terhadap Dosen

Berdasarkan Peraturan Rektor ITS No 15 Tahun 2019, berikut adalah tangkapan layar "Etika Mahasiswa Terhadap Dosen" yang diambil dari sumber aslinya [1].

Dalam artikel ini, saya ingin menggaris bawahi etika komunikasi mahasiswa terhadap dosen seperti tercantum pada poin C. Satu kata untuk menggambarkan etika mahasiswa terhadap dosen adalah "santun".

Arti santun menurut KBBI

san.tun:

  1. (adjektiva) halus dan baik (budi bahasanya, tingkah lakunya); sabar dan tenang; sopan
  2. (adjektiva) penuh rasa belas kasihan; suka menolong

Arti santun menurut saya

Santun menurut saya harus mencakup setidaknya tiga hal berikut:

  1. Menggunakan jalur dan bahasa resmi.
  2. Jalur resmi: Telfon, email kampus, dan SMS (bukan WA, facebook)
    Bahasa resmi: Bahasa Indonesia (bukan jawa, Inggris)
  3. Mengkonfirmasi segala percakapan dan instruksi
  4. Contoh:
    Dosen: Gunakan metode A dan laporkan hasilnya minggu depan senin 30 Agustus 2021
    Mahasiswa: Baik Bapak, saya akan melakukan metode A dan melaporkan hasilnya senin 30 Agustus 2021
  5. Memperhatikan waktu komunikasi, termasuk segera membalasnya jika butuh balasan
  6. Butuh balasan ditandakan dengan: kalimat tanya, perintah, permohonan, dll.

Perkecualian untuk kasus-kasus di atas tentunya dengan seizin dosen dan kedua belah pihak. Misalnya dosen telah mengizinkan mahasiswa untuk mengontaknya via (Facebook) messenger atau (Google) chat.

Khusus saya

Cara terbaik mengontak saya adalah dengan email. Waktu tidak masalah bagi saya. Anda bisa mengirim email ke saya kapan saja. Orang terbaik menurut saya adalah orang yang paling cepat membalas email.

Penutup

Panduan ini tidak hanya berlaku untuk mahasiswa-dosen, bisa diaplikasikan pada kasus lainnya.

Referensi: 

[1] https://www.its.ac.id/ppid/wp-content/uploads/sites/68/2021/02/15.-Peraturan-Rektor-Nomor-15-Tahun-2019-ttg-Kode-Etik-Mahasiswa.pdf

Monday, September 06, 2021

Mengundurkan Diri Itu Bukan Perbuatan Tercela

Saat saya bekerja di pabrik dulu, suatu kali pernah (ibu) sekretaris perusahaan mengundurkan diri. Ceritanya begini. Saat permintaan barang sedang tinggi-tingginya, Pak Direktur (aka sachou) meminta bu sekretaris ikut bekerja di lapangan (genba a.k.a. pabrik). Besoknya si ibu sekretaris langsung minta mengundurkan diri untuk bulan depannya. Alasannya sederhana: dia melamar kerja untuk pekerjaan administrasi, bukan untuk pekerjaan lapangan (genba).

Mirip dengan cerita di atas. Suatu ketika seorang adik kelas melamar  pekerjaan dosen di suatu perguruan tinggi. Setelah diterima, dia komplain karena diminta oleh kepala jurusan (kajur) untuk mengerjakan pekerjaan administrasi. Tak lama kemudian dia mengundurkan diri. Alasannya sederhana: dia melamar pekerjaan dosen, menjadi pengajar dan peneliti, bukan menjadi staf administrasi.

Dalam dua kasus di atas, hampir tidak ada pihak yang salah. Pak direktur mempekerjakan ibu sekretaris karena kekurangan tenaga kerja di lapangan. Di kasus kedua, Pak Kajur juga kekurangan tenaga administrasi (yang terampil) sehingga mempekerjakan dosen untuk pekerjaan administrasi. Dari kedua kasus, baik bu sekretaris maupun teman dosen sama sekali tidak salah. Juga, mereka sulit menolak pekerjaan yang bukan bidangnya karena statusnya sebagai karyawan pada tempat mereka bekerja. Mundur menjadi pilihan terbaik bagi keduanya.

Mundur juga bisa menjadi alasan yang logis ketika tidak setuju dengan suatu hal, misalnya ketika diharuskan untuk menginstall whatsapp (WA) untuk urusan kerja. Sangat tidak logis dan tidak etis menggunakan WA untuk urusan pekerjaan. Seorang teman pernah berujar, hari dimana dia diminta menginstall WA oleh atasannya, hari itu juga dia akan mengundurkan diri. Penggunaan WA dan sejenisnya di kantor saya sekarang ini dilarang, dan bisa fatal akibatnya bila ketahuan menggunakan aplikasi tsb di kantor.

Mengundurkan diri itu bukan perbuatan tercela. Perbuatan tercela itu seperti korupsi

Monday, August 30, 2021

Kenapa Harus Berlari...

Saat kerja di Jepang, saya sering dipanggil oleh Pak Bos. Saat awal-awal di panggil, saya mendatanginya dengan berjalan. Pak Bos menyuruh saya berlari. Kalau berjalan saya butuh 1 menit, dengan berlari saya hanya butuh 30 detik. Kalau dalam sehari saya dipanggil 30 kali, maka saya bisa hemat 30 x 30 detik, 900 detik alias 15 menit. Dengan asumsi kerja 20 hari per bulan, saya bisa menghemat 15 x 20 menit alias 300 menit alias 5 jam per bulan. Waktu tsb bisa saya gunakan untuk pekerjaan lainnya. Kenapa harus berlari? Ya karena berlari mempercepat pekerjaan dan menunjukkan semangat kita.

Dalam tulisan saya yang lain: What we can do in 10 minutes, orang lain bisa mentransformasikan ide menjadi "produk" dalam 10 menit. Diberikan waktu 300 menit akan menghasilkan 10 ide  --> 10 produk, untuk orang tersebut.

Ayo berlari...!

Monday, August 23, 2021

How-to: Install jedi-vim in python 2.7

Rationale:

  • Although nowadays python3 becomes standard, in some servers the default python is still python2.7 (mostly RHEL servers).
  • Using vim (or emacs) in remote works is a must. You may use GUI, but the setup is more complicated than CLI.
  • Using vim without plugins is hard. We should use a minimum number of plugins. The most important plugin is code completion.
  • Humans make errors inevitably. Code completion prevents typos.

Based on those rationales, this is one line command to install jedi-vim (including jedi itself!) in python 2.7.

git clone --recursive https://github.com/davidhalter/jedi-vim.git --branch 0.9.0 ~/.vim/bundle/jedi-vim
Note: you need to install vim-pathogen first to allow plugin installation via "bundle" directory.

Thursday, August 19, 2021

Kenapa Harus Meng-CC email ke Diri Sendiri

Salah satu budaya "aneh" orang Jepang yang akhir-akhir ini mulai saya tiru adalah meng-cc email ke diri sendiri.

Saat awal datang ke Jepang, saya merasa aneh saja ada orang mengemail ditujukan (CC, carbon copy) ke diri sendiri. Professor saya melakukannya. Professor-professor lain pun ternyata juga sama. Saat itu professor saya meminta saya meng-CC email ke diri saya setiap kali mengemail beliau, namun saya jarang melakukannya. Sepuluh tahun berlalu, kini kebiasaan itu menjadi wajib bagi saya.

Kenapa harus meng-cc email ke diri sendiri?

Agar kita tahu, apakah email kita sampai atau tidak. Seseorang mungkin akan berargumen, kalau tidak sampai pasti ada notifikasi. Bisa jadi benar, tapi bisa jadi tidak semua email provider memberikan notifikasi jika ada email yang bouncing (tidak terkirim karena alasan teknis, misal alamat tidak tersedia, atau email tujuan penuh, atau alasan yang lain). Kalaupun toh pasti ada notifikasi jika tidak terkirim, tetap kita dapat mengambil manfaat, yakni lamanya waktu pengiriman. Alih-alih mengirim email dua kali (ganda), kita bisa mengecek apakah email yang kita kirim sudah diterima atau belum.

Monday, August 16, 2021

Install sox locally in cluster without root

This time, I can't install homebrew in (AIST) cluster as I previously did in JAIST cluster. Here are steps to documents how to install SoX, one of the most important library in sound processing, locally in cluster. I tried these steps in abci.ai.

# download sox package, in this case
wget https://nchc.dl.sourceforge.net/project/sox/sox/14.4.2/sox-14.4.2.tar.gz

# extract sox package
tar xvfz sox-14.4.2.tar.gz

# change to extracted sox directory
cd sox-14.4.2

# configure in local directory, I used $HOME
./configure --prefix=$HOME

# make
make

# make install
make install
Then check it by its version
[user13432@es2 ~]$ sox --version
sox:      SoX v14.4.2
You may also need to update $PATH to make it works in your enviroment.

Wednesday, August 11, 2021

Kenapa Harus Email, bukan WA

TL;DR: Kalau saya jadi CE0, dan ada karyawan saya yang menggunakan WA untuk urusan kerja, akan saya pecat saat itu juga... :D

Pada tulisan ini saya berargumen bahwa komunikasi untuk urusan pekerjaan seharusnya (dan umumnya) dilakukan menggunakan email, bukan WA (WhatsApp), messenger, chat dan sejenisnya. Di tempat kerja saya kebetulan tidak ada yang memakai WA; LINE kabarnya juga sudah dilarang sejak beberapa tahun yang lalu. Sebagai tambahan, penggunaan aplikasi zoom juga dilarang karena faktor keamanan.

Sebelum membaca tulisan ini ada baiknya anda membaca tulisan berikut: WA: Pemborosan Waktu..?

Kenapa harus menggunakan Email: 

  1. Terekam, recorded
  2. Salah satu fitur email yang paling powerful adalah "terekam". Apa isi email, kapan terkirim, dari siapa, ke siapa, semua ada. Bahkan email pertama yang saya buat waktu SMP masih bisa saya baca sampai sekarang. WA? Bisa! Tapi saya tidak tahu apa isi WA pertama saya. Anda tentu paham maksud saya, dua-duanya memiliki fitur terekam, tapi bak langit dan bumi.
  3. Searchable, ketercarian
  4. Fitur kedua yang amat saya sukai dari email: ketercarian. Data teks adalah data yang sangat kompleks tapi fleksibel. Kita bisa mencari apa saja yang pernah masuk ke email kita. WA? Bisa juga, selama belum dihapus, belum ganti hape, dan belum ganti nomor.
  5. Per topik
  6. Pentingnya menggunakan email adalah bisa berdiskusi per topik. Ada yang  mengirim email dengan subjek tertentu dan kita balas (Re:XXX). Berapapun panjang dan lama diskusi tersebut tidak masalah. Ini akan menjadi masalah dengan WA dengan layar kecil, ketercarian dan rekaman yang terbatas.
  7. Universal
  8. Email itu universal dan cross-platform, tidak di monopoli oleh perusahaan tertentu. Anda pakai yahoo, saya pakai gmail, tidak menjadi masalah, masih bisa berkirim email. Beda dengan WA, LINE, messenger, dan sejenisnya yang hanya berjalan pada platform yang sama.
  9. Email menempel pada akun, bukan nomor HP
  10. Kelebihan email selanjutnya adalah bahwa dia adalah akun independen, tidak menempel pada nomor HP. Nomor HP bisa digunakan untuk pengamanan ganda. Berbeda dengan WA yang menempel pada nomer HP. Jika ganti nomor kita harus mentransfer akun WA ke nomor baru. Jika tidak, by default, prinsipnya, ganti nomor ganti WA.

Itulah beberapa alasan kenapa harus menggunakan email untuk komunikasi tulisan dalam urusan pekerjaan. Lebih khusus lagi, kita seharusnya menggunakan email kerja (kantor) untuk urusan pekerjaan, bukan email personal atau individu. Tempat kita bekerja menyediakan email kantor untuk urusan pekerjaan (tidak berlaku jika kantor tidak menyediakan). Sampai sekarang pun saya tidak tahu email lain atasan saya selain email kantor (dan Slack!).

Semoga semakin banyak orang yang "hijrah" dan "bertobat" setelah membaca tulisan ini: tidak memakai WA lagi.

Jika tidak setuju dengan argumen saya ini, tulis alasan anda dan beritahu saya (setidaknya URLnya) melalui komen di bawah ini.

Wednesday, August 04, 2021

Extracting Emobase Feature Using Python-Opensmile under Windows (WSL)

This article documents my steps to extract acoustic features with "emobase" configuration on opensmile-python under Windows. I used WSL (Window Sub-System for Linux) with Ubuntu Latest (20.04). Click each image for larger size and clarity.

0. Windows Version

Here is my Windows version in which I experimented with. Other versions may give errors. To show your version, simply press the Windows button and type "about PC".
Edition	        Windows 10 Pro
Version	        20H2
Installed on	‎4/‎2/‎2021
OS build        19042.1083
Experience      Windows Feature Experience Pack 120.2212.3530.0

1. Activate WSL2

Here are the steps to activate WSL2 on Windows 10. WSL2 only works on Windows 10 version 1903 or higher, with Build 18362 or higher. For the older version, you can use WSL instead of WSL2.
a. Activate WSL using PowerShell. Press the Windows key, and enter the following.
 dism.exe /online /enable-feature /featurename:Microsoft-Windows-Subsystem-Linux /all /norestart 
b. Install Linux kernel update package. Download from here.
https://wslstorestorage.blob.core.windows.net/wslblob/wsl_update_x64.msi
Double click and install that .msi package.
Select WSL2 as default.
 wsl --set-default-version 2 

You need to ensure the wsl version after installing Ubuntu distro below.

2. Install Ubuntu

Press windows key and type "Microsoft Store". I choose Ubuntu (latest) instead of Ubuntu 20.04 or other versions. See image below; I already installed it.


Ensure that Ubuntu uses WSL2 as default. Check-in PowerShell with the following command (wsl -l -v).

Then click launch Ubuntu from the previous image/step, or you can type "Ubuntu" di search dash.
When launching Ubuntu for the first time, you will be prompted for the user name and password. Remember this credential. See the image below for example.

3. Install Python and pip

In Ubuntu do/type
 sudo apt update && sudo apt -y upgrade 
Enter your password. Type "y" when it is prompted.
Install Python using apt. I chose python3.7 as follows.
 sudo apt install python3.7-full 
Type "y" when it asked. See the image below for reference.

Test if the installation is successful. Type "python3.7" in Ubuntu to enter python3.7 console.

Next, we need pip to install python packages. Hence, we need to install pip first as follows.
 python3.7 -m ensurepip --upgrade 

4. Install Python-Opensmile

Since this version of python in Ubuntu is already equipped with pip, we can directly use it to install opensmile.
 python3.7 -m pip install opensmile 
See the image below for a reference.

Same as previous step, I installed IPython for my convenience. You may also need to install numpy, scipy, and matplotlib.
 python3.7 -m pip install ipython numpy scipy audb

We also need to install sox since it is required by opensmile
 sudo apt install sox 

5. Extract Emobase Feature

Now is the time to use opensmile. First, open IPython console for this python3.7.
 python3.7 -m IPython 
Import Opensmile and download emodb dataset with a specific configuration.
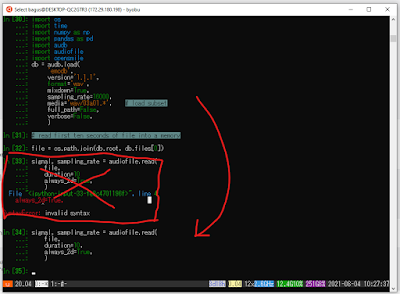
See the image below for your reference. Skip the parts with red cross since they contain errors (I forgot to add a comma between arguments).

Configure opensmile to extract EMOBASE feature.
smile = opensmile.Smile(
    feature_set=opensmile.FeatureSet.emobase,
    feature_level=opensmile.FeatureLevel.Functionals,
)
smile.feature_names
See image below for your reference. You can change feature_level value to "opensmile.FeatureLevel.LowLevelDescriptors" if you want LLD (LowLevelDescriptors, extracted per frame) instead of functionals (statistics of LLD). The number of emobase functional is 988 features [len(smile.features_names)].

Finally, we extract acoustic features based on these configuration.
smile.process_signal(
    signal,
    sampling_rate
)
See below image for your reference.


That's all. Usually, I save the extracted acoustic features in other format like numpy .npy files or .csv files. From my experience, this is my first extraction of emobase feature set. Previously I used gemaps, egemaps, compare2016, and emo_large configuration. Let see if this kind of feature set has advantages over others. Although intended for Windows 10, this configuration may also works for other distribution. Still, I prefer to use Ubuntu since the process is simple and straightforward. No need to set WSL2 and other things just pip and pip.

The full script to extract emobase functional features from all utterances in emodb dataset is given below. Please note that it takes a long time to process since it will download all utterances in emodb dataset according to "audb" format and extract acoustic features from them.

Example 1: Extract emobase feature from an excerpt of emodb dataset and save it as an .npy file.

import os
import time

import numpy as np
import pandas as pd

import audb
import audiofile
import opensmile

sr = 16000

# if you change code below, it will download the dataset again 
db = audb.load(
    'emodb',
    version='1.1.1',
    format='wav',
    mixdown=True,
    sampling_rate=sr,
    full_path=False,
    verbose=True,
)

smile = opensmile.Smile(
    feature_set=opensmile.FeatureSet.emobase,
    feature_level=opensmile.FeatureLevel.Functionals,
)

# If you run this program for the second time
# comment the whole db above and change db.root and db.files to (uncomment)
# db_root = audb.cached().index[0]
# db_files = pd.read_csv('/home/bagus/audb/emodb/1.1.1/fe182b91/db.files.csv')['file']

feats = []
for i in db.files:
    file = os.path.join(db.root, db.files[i])
    signal, _ = audiofile.read(
            file,
            always_2d=True,
            )
    feat = smile.process_signal(
            signal,
            sr
            )
    feats.append(feat.to_numpy().reshape(-1))

# this will save all emodb emobase feature in a single npy file
# make sure you have 'data' dir first
np.save('data/emodb_emobase.npy', feats)
  

Example 2: Extract emobase features from files under a directory ("ang") and save it in a csv file.
import os
import opensmile
import numpy as np
import glob
#from scipy.io import wavfile

# jtes angry path, 50 files
data_path ="/data/jtes_v1.1/wav/f01/ang/"
files = glob.glob(os.path.join(data_path, "*.wav"))
files.sort()

# initiate opensmile with emobase feature set
smile = opensmile.Smile(
    feature_set=opensmile.FeatureSet.emobase,
    feature_level=opensmile.FeatureLevel.Functionals,
)
smile.feature_names

# read wav files and extract emobase features on that file
feat = []

for file in files:
    print("processing file ... ", file)
    #sr, data = wavfile.read(file)
    #feat_i = smile.process_signal(data, sr)
    feat_i = smile.process_file(file)
    feat.append(feat_i.to_numpy().flatten())

# save feature as a csv file, per line, with comma
np.savetxt("jtes_f01_ang.csv", feat, delimiter=",")


If you face problems during following this article, let me see in comments below.

Reference:
[1] https://docs.microsoft.com/en-us/windows/wsl/install-win10
[2] https://audeering.github.io/opensmile-python/usage.html

Monday, August 02, 2021

Python: memanggil nama variabel secara dinamis dalam loop for

Misalkan kita punya data seperti ini:
a_1 = 1
a_2 = 2
a_3 = 3
Kemudian kita ingin memanggi variabel tersebut secara berurutan dalam loop for. Karena nama-nama variabel tersebut mirip dan hanya berbeda karakter terakhir saj, maka pemanggilan variabel tersebut bisa kita permudah, misalnya dengan cara "a_[i}", dimana "i" adalah indeks mulai dari i. Saya menggunakan kurung kurawal karena implementasi pada teknik yang dipakai juga seperti itu. Pemanggilan nama variabel secara dinamis seperti ini dalam Python bisa menggunakan fungsi "globals()" seperti berikut.
for i in range(1,4):
    print(globals()[f"a_{i}"])
Outputnya adalah nilai a_1, a_2, dan a_3 secara berurutan.
1
2
3

Perbedaan dengan list biasa 

Untuk menampilkan output di atas bisa saja dengan teknik berikut.
for i in [a_1, a_2, a_3]:
    print(i)
Namun tujuan saya bukan output, tapi proses pemanggilannya. Dalam banyak hal, kita butuh memanggil nama variabelnya saja dan mengakses anggota kelasnya. Misal jika variabel "a_" memiliki child (anak) .panjang, .lebar, .tinggi, maka metode tsb (methods dalam pengertian pemrograman) bisa dipanggil dengan teknik nama variabel dinamis di atas. Akan sulit jika memakai list biasa.

Thursday, July 08, 2021

Japanese sentiment analysis

Make virtual environment:
 python3.6 -m venv hf-venv # hf-venv: huggingface-virtualenv 
Activate virtualenv:
 source hf-ven/bin/activate 
Install Huggingface's Transformer with torch:
 python3.6 -m pip install transormer[torch] 
Install other dependencies (required if you don't have them)
 python3.6 -m pip install --user -U fugashi ipadic pillow 
Try to make Japanese sentiment analysis as follows.
>>> from transformers import AutoTokenizer, AutoModelForSequenceClassification, pipeline
>>> model = "daigo/bert-base-japanese-sentiment"
>>> tokenizer = "daigo/bert-base-japanese-sentiment"
Run it! Output:
>>> print(pipeline("sentiment-analysis", model=model, tokenizer=tokenizer, return_all_scores=True)("家で見守ってます")) 
[[{'label': 'ポジティブ', 'score': 0.9886383414268494},
  {'label': 'ネガティブ', 'score': 0.01136170607060194}]]
List of installed packages
(hf-venv) bagus@qc2gtr3:~$ pip freeze
certifi==2021.5.30
chardet==4.0.0
click==8.0.1
dataclasses==0.8
filelock==3.0.12
fugashi==1.1.0
huggingface-hub==0.0.12
idna==2.10
importlib-metadata==4.6.1
ipadic==1.0.0
joblib==1.0.1
numpy==1.19.5
packaging==21.0
Pillow==8.3.1
pyparsing==2.4.7
PyYAML==5.4.1
regex==2021.7.6
requests==2.25.1
sacremoses==0.0.45
six==1.16.0
tokenizers==0.10.3
torch==1.9.0
tqdm==4.61.2
transformers==4.8.2
typing-extensions==3.10.0.0
urllib3==1.26.6
zipp==3.5.0

Troubleshooting when there is not enough (ram) memory to install torch

Since torch is big enough (831 MB for v1.9) there is not enough memory in my home directory to install. As an alternative, I made another temporary directory for the cache and pointed it out to that directory when installing torch.
$ pip cache dir # works on pip==21.1.3
/home/bagustris/.cache/pip
$ mkdir -p /media/bagustris/atmaja/tmp
$ TMPDIR=/media/bagustris/atmaja/tmp/ pip install --cache-dir=/media/bagustris/atmaja/tmp/ transformers[torch]

Monday, June 28, 2021

Resources for academic writing: word concordance

When I am writing an academic paper, for a journal, or a conference, I used several tools to find the most precise words. Among these, the following are the most I used ones.
Among those resources, the Mendeley is the most I used since it used the words in my field and can be used offline on my local PC. This technique is also intended to avoid the creation of jargon or our own words. Instead of creating "new words", it is better to follow the words already used by other researchers. Below is my search for the word "splitting" that leads to concord with "into".


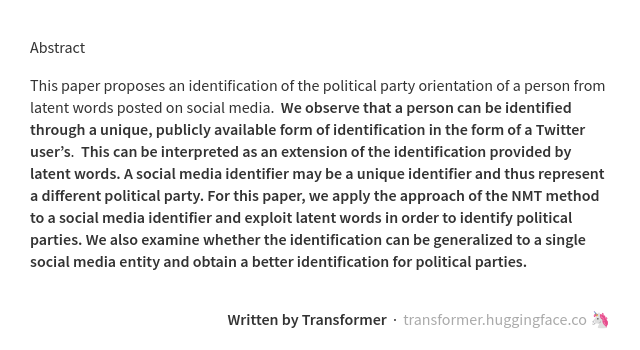
Abstract Generated by Transformer
I tried Huggingface's Transformer once. Instead of generating word concordance, they complete my abstract given only one sentence.


Saturday, June 26, 2021

Ubuntu on Mac: Home, End, PgUp, PgDn

Here the equivalent keyboard shorctus for Ubuntu on Macbook (it also works for OSX).
Home: Fn + Left Arrow
End: Fn + Right Arrow
Page Up: Fn + Up Arrow
Page Down: Fn + Down Arrow
That's all. Tested on: MBP Mid 2012, Ubuntu 16.04.07.

Tuesday, June 22, 2021

Sympy: Menyelesaikan Persamaan Matrik

Sympy melakukan proses komputasi yang tidak bisa dilakukan oleh Numpy: simbolik. Misal kita punya persamaan berikut

$$2.10^{6}\left[\begin{array}{crr} 1 & -1 & 0 \\ -1 & 2 & -1 \\ 0 & -1 & 1 \end{array}\right]\left\{\begin{array}{l} 0 \\ u_{2} \\ u_{3} \end{array}\right\}=\left[\begin{array}{c} F_{1}+1500 \\ 9000 \\ 7500 \end{array}\right] $$
Dalam bentuk gambar, persamaan di atas dapat ditampilkan di bawah ini (rendering kode Latex/mathjax di atas kadang Luama....).
Untuk menyelesaikan persamaan di atas (u1=0), maka solusi dengan Sympy adalah seperti kode di bawah ini:
from sympy import *

# buat symbol
u2, u3, F1 = symbols('u2 u3 F1')

# matrik sebelah kiri (left-hand)
K = Matrix([[ 1, -1, 0], [-1, 2, -1], [0, -1, 1]]) 
Ke1 = 2e6*K
U = Matrix([0, u2, u3]).reshape(3,1)

# matrik sebelah kanan
F = Matrix([F1+1500, 9000, 7500])

# selesaikan: cari u2, u3, dan F1
sol = solve(Ke1*U-F, (u2, u3, F1))


Jika dijalankan, hasilnya adalah sebagai berikut.
print(sol)
{u2: 0.00825000000000000, u3: 0.0120000000000000, F1: -18000.0000000000}

Monday, June 21, 2021

Numpy: Broadcasting

Konsep python yang agak susah dipahami adalah operasi broadcasting. Operasi broadcasting merupakan "menyebar" pesan ke seluruh elemen matrik. Contoh sederhana, matrik c saya tambahkan dengan '5', maka semua elemen dalam matrik c akan ditambah dengan nilai 5. Operasi ini, sesuai konsep vektorisasi Numpy, akan jauh lebih cepat dari loop `for'. Syarat operasi broadcasting ini adalah setidaknya harus ada kompatibilitas antar aksisnya, bisa kolomnya, bisa barisnya, atau skalar. Misalnya matrik c  dengan ukuran (3, 3) bisa kita tambah dengan [1, 2, 3] tapi tidak dengan [1, 2, 3, 4].
>>> c = np.array([[ 5,  8, 11],
      [ 6,  9, 12],
      [ 7, 10, 13]])
>>> c +  [1, 2, 3]  # bisa juga dengan list langsung
array([[1,  5,  9],
      [ 2,  6, 10],
      [ 3,  7, 11]])
>>> c + np.array([1, 2, 3, 4])                
------------------------------------------
ValueError   Traceback (most recent call last)
< ipython-input-42-d334d3cf449e> in < module >
----> 1 c + np.array([1, 2, 3, 4])

ValueError: operands could not be broadcast together
with shapes (3,3) (4,)
Contoh lain adalah penjumlahan vektor kolom [1, 2, 3] dengan vektor baris [1, 2, 3]. Contoh ini menunjukkan betapa menariknya operasi broadcasting, kolom dijumlah dengan baris. Pada kolom pertama hasilnya menjadi [2, 3, 4], tiap elemen vektor kolom ditambah 1. Pada kolom 2 tiap elemen vektor kolom ditambah 2, dan pada elemen 3 tiap elemen vektor kolom ditambah dengan 3.
>>> np.array([1, 2, 3])[:, np.newaxis]+np.array([1, 2, 3])                                                                            
array([[2, 3, 4],
       [3, 4, 5],
       [4, 5, 6]])
Tulisan ini melengkapi tulisan ini.

Thursday, June 10, 2021

Membatasi Pen Tablet pada Satu Monitor

Skenario

Menggunakan dua atau lebih monitor menjadikan kita produktif, namun dengan menggunakan pen tablet (misal saya menggunakan Huion 950P) pada dua monitor sangat mengganggu. Pen tablet akan lari kesana kesini karena perbedaan ruang di pad yang kecil dan di dua monitor yang cukup besar. Hal ini berakibat kepada ketidaknyamanan ketika menulis dengan menggunakan aplikasi whitboard seperti xournal. Berikut adalah solusi membatasi pen tablet (khususnya gerakan stylus) hanya pada satu monitor saja di Ubuntu 20.04. 


Pilih monitor mana 

Perintah di terminal adalah
bagus@m049:tmp$ xrandr
Screen 0: minimum 320 x 200, current 3840 x 1080, maximum 16384 x 16384
HDMI-1 connected 1920x1080+0+0 (normal left inverted right x axis y axis) 698mm x 393mm
   1920x1080     60.00*+  50.00    59.94  
   1920x1080i    60.00    50.00    59.94  
   1680x1050     59.88  
   1280x1024     75.02    60.02  
   1440x900      74.98    59.90  
   1280x960      60.00  
   1152x864      75.00  
   1280x720      60.00    50.00    59.94  
   1440x576      50.00  
   1024x768      75.03    70.07    60.00  
   832x624       74.55  
   800x600       75.00    60.32    56.25  
   720x576       50.00  
   720x480       60.00    59.94  
   640x480       75.00    66.67    60.00    59.94  
   720x400       70.08  
DP-1 connected primary 1920x1080+1920+0 (normal left inverted right x axis y axis) 598mm x 336mm
   1920x1080     60.00*+  74.97    50.00    59.94  
   1920x1080i    60.00    50.00    59.94  
   1600x1200     60.00  
   1680x1050     59.95  
   1280x1024     75.02    60.02  
   1440x900      74.98    59.89  
   1280x960      60.00  
   1152x864      75.00  
   1280x720      60.00    50.00    59.94  
   1024x768      75.03    60.00  
   832x624       74.55  
   800x600       75.00    60.32  
   720x576       50.00  
   720x480       60.00    59.94  
   640x480       75.00    60.00    59.94  
   720x400       70.08  
HDMI-2 disconnected (normal left inverted right x axis y axis)
Pada kasus di atas, saya memilih DP-1 sebagai monitor untuk pen stylus. Monitor ini menggunakan koneksi display port sehingga namanya DP-1. 

Pilih divais mana 

Perintah di terminal adalah
bagus@m049:tmp$ xinput
⎡ Virtual core pointer                    	id=2	[master pointer  (3)]
⎜   ↳ Virtual core XTEST pointer              	id=4	[slave  pointer  (2)]
⎜   ↳ Lite-On Technology Corp. USB Multimedia Keyboard Consumer Control	id=11	[slave  pointer  (2)]
⎜   ↳ USB Optical Mouse                       	id=13	[slave  pointer  (2)]
⎜   ↳ Tablet Monitor stylus                   	id=15	[slave  pointer  (2)]
⎜   ↳ Tablet Monitor Dial pad                 	id=16	[slave  pointer  (2)]
⎜   ↳ Tablet Monitor Touch Strip pad          	id=17	[slave  pointer  (2)]
⎜   ↳ Tablet Monitor Pad pad                  	id=18	[slave  pointer  (2)]
⎣ Virtual core keyboard                   	id=3	[master keyboard (2)]
    ↳ Virtual core XTEST keyboard             	id=5	[slave  keyboard (3)]
    ↳ Power Button                            	id=6	[slave  keyboard (3)]
    ↳ Video Bus                               	id=7	[slave  keyboard (3)]
    ↳ Power Button                            	id=8	[slave  keyboard (3)]
    ↳ Sleep Button                            	id=9	[slave  keyboard (3)]
    ↳ Lite-On Technology Corp. USB Multimedia Keyboard	id=10	[slave  keyboard (3)]
    ↳ Lite-On Technology Corp. USB Multimedia Keyboard System Control	id=12	[slave  keyboard (3)]
    ↳ Lite-On Technology Corp. USB Multimedia Keyboard Consumer Control	id=14	[slave  keyboard (3)]
Output yang penting dari output perintah di atas adalah "id". Saya memilih id 15-18 karena itu adalah id pen tablet saya. 

Map ke satu monitor 

Langkah terakhir adalah mapping. Perintahnya adalah berikut
bagus@m049:ptxconf$ xinput map-to-output 15 DP-1
bagus@m049:ptxconf$ xinput map-to-output 16 DP-1
bagus@m049:ptxconf$ xinput map-to-output 17 DP-1
bagus@m049:ptxconf$ xinput map-to-output 18 DP-1
Selesai! Sekarang saya bisa dengan leluasa menggunakan stylus di satu monitor untuk keperluan kuliah online. Berikut contohnya!


Konfigurasi Tambahan dan Menambahkan pada start up application

Agar setting di atas tetap alias tidak berubah pada setiap kali reboot, peintah mapping perlu kita tambahkan pada start up application. Dari empat perintah mapping di atas, perintah mapping stylus merupakan yang utama dan itu saja yang sebenarnya perlu ditambahkan.
 
Buat file 950p.sh di direktori /home/namamu dan isi dengan teks berikut.
MONITOR="DP-1"
PAD_NAME='Tablet Monitor'
ID_STYLUS=$(xinput | grep "Tablet Monitor stylus" | cut -f 2 | cut -c 4-5)
xinput map-to-output $ID_STYLUS $MONITOR

# konfigurasi tambahan untuk Krita, Xournalpp
xsetwacom set "$PAD_NAME Pad pad" button 1 key Ctrl z # undo
xsetwacom set "$PAD_NAME Pad pad" button 2 key Ctrl y # redo
xsetwacom set "$PAD_NAME Pad pad" button 3 key Ctrl shift p # pen
xsetwacom set "$PAD_NAME Pad pad" button 8 key Ctrl shift e # eraser
xsetwacom set "$PAD_NAME Pad pad" button 9 key Ctrl shift h # highlight
xsetwacom set "$PAD_NAME Pad pad" button 10 key Ctrl 1 # shape recognizer
xsetwacom set "$PAD_NAME Pad pad" button 11 key Ctrl shift r # select rect.
xsetwacom set "$PAD_NAME Pad pad" button 12 key Ctrl d # new page after

 
Kemudian, tambahkan perintah pada startup application seperti berikut.
Startup application > Add > Command > huion950p.sh

Bonus

Agar ukuran papan tulis bisa penuh satu monitor, saya membuat 'page' custom di aplikasi whiteboard sesuai ukuran monitor saya yakni 27 inchi (598mm x 336mm). Ukuran tsb juga didapatkan dari output perintah xrandr. Untuk tingginya saya kurangi sedikit karena ada toolbar milik xournal. Sehingga,
width = 59 cm, dan
height = 26 cm.

Wednesday, June 09, 2021

Eight Steps to Structuring an Academic Paper

The following tips are my version of "11 steps to structuring a science paper". I revised it from 11 to 8 because of the following reasons.
  1. It makes sense to draft the topic (concretely a title) before starting to structuring the paper.
  2. After drafting a title, it is necessary to draft an abstract along with the keywords to plan what we want to write. These abstract and keywords will guide and give an overview of the overall content of the paper.
  3. I dropped the writing reference. It should be done automatically via BibTeX. Acknowledgment is not necessary unless your research receive funding or important helps from other researchers/agencies.
Here you are.


Note after finishing writing a compelling introduction, you didn't finish your paper yet. You need to revise it many times, mine usually about ten times. In revising, you should follow the order of your paper, from Title to Reference.


Reference: 
 [1] https://www.elsevier.com/connect/11-steps-to-structuring-a-science-paper-editors-will-take-seriously

Friday, June 04, 2021

Python: List Comprehension

Salah satu fitur di pemrograman Python yang saya suka dan sering pakai adalah list comprehension. Fitur ini menyederhanakan "for" loop dalam satu baris. Berikut contohnya.

Saya punya dua vektor A dan B. Saya ingin mencari dimana kemunculan vektor B dalam vektor A. 

a = np.array([1, 2, 3, 4, 5, 6])
b = np.array([2, 3, 4])
Dengan contoh di atas, jawaban atas pertanyaan saya adalah [1, 2, 3]; posisi/indeks dimana vektor B muncul di vektor A. Solusi pertama dengan "for" loop sebagai berikut:
import numpy as np
for i in b: 
    print(np.where(a == i)) 
Solusi kedua dengan List comprehension seperti berikut (baris kedua merupakan output).
In [26]: [np.where(a==x) for x in b]                                            
Out[26]: [(array([1]),), (array([2]),), (array([3]),)]
Cukup simpel dan intuitif.

Wednesday, June 02, 2021

Membuat Symbolic Link di Windows 10

Salah satu "kesalahan besar" penamaan foder atau direktori adalah membolehkan spasi pada penamaan folder atau direktori tersebut. Hal ini sangat menyulitkan ketika bekerja dengan folder lewat teks (CLI, command line interface). Sebagai contoh nyata, windows membuat direktori OneDrive 365 dengan format "OneDrive Nama Perusahaan". Untuk menghindari kesalahan ketika bekerja di terminal (solusi lainnya: selalu memakai tanda kutip untuk memanggil nama folder di terminal) caranya adalah membuat symbolic link antara dari folder yang memiliki spasi pada nama tadi. Caranya adalah sebagai berikut (lewat Cmd bukan PowerShell).
C:\Users\bagus>mklink /J onedriveAIST "OneDrive - 国立研究開発法人産業技術総合研究所"
Junction created for onedriveAIST <<===>> 'OneDrive - 国立研究開発法人産業技術総合研究所
Dengan membuat symbolic seperti ini (mklink /J destinasi sumber), kita bisa berpindah direktori secara leluasa, khususnya di WSL (Windows Subsystem for Linux).

Update
Perintah di atas sebenarnya sama dengan perintah bash softlink yakni `ln -s`. Jadi pembuatan symbolic link di atas juga bisa dilakukan di terminal WSL sebagai berikut.
ln -sf "OneDrive - 国立研究開発法人産業技術総合研究所" onedriveAIST

Monday, May 31, 2021

Data Jalan Kaki, Tidur, dan Detak Jantung September 2020 - Maret 2021

September 2020 sampai dengan maret 2021 adalah bulan-bulan terakhir saya menjalani PhD di JAIST, Kota Nomi, Prefektur Ishikawa di Jepang. Kebetulan, di akhir september 2020 saya membeli mi band 4 yang murah meriah. Gelang tersebut memuat sensor langkah (jalan kaki), waktu tidur, dan detak jantung (BPM, beat per minute) selain data lainnya. Berikut saya sajikan data tersebut ketika berjuang menyelesaikan tahapan-tahapan terakhir studi S3 di JAIST.

Setting alat

Tidak ada yang spesial dalam mengkonfigurasi mi band saya. Hanya saja, saya mengeset "sleep assistant" pada "heart rate monitoring" (Profile > Mi Smart Band 4 > Heart rate monitoring). Selain itu saya off-kan semua. Dengan cara ini, sensor deteksi waktu tidur akan lebih akurat dan umur baterai band lebih panjang. Biasanya saya mengisi catu daya (charge) band saya sekitar sebulan sekali. Lebih kurang setiap 28 hari sekali.

Visualisasi data dilakukan dengan bantuan libreoffice Calc. Fitur yang dipakai adalah pivot table dan group and outline. Berikut datanya.

Data langkah kaki


Data rata-rata langkah kaki per bulan; distance dalam meter, calories dalam kcal

Sebagai informasi tambahan, jarak antara rumah (apato) dan lab di kampus hanya 200 m. Hanya saja, apato saya berlokasi di lantai 5 (tidak ada lift), sedang lab saya ada di lantai 9 (ada lift). Dengan kondisi di tempat terpencil demikian justru saya masih bisa menjaga langkah jalan kaki sekitar delapan ribu langkah per hari.

Data waktu tidur (deep sleep, shallow sleep, total)

Data lama tidur September 2020 - Maret 2021

Data rata-rata lama tidur, mulai tidur, dan bangun tidur

Dari data tidur di atas nampak tidak ada perubahan berarti ketika mengerjakan disertasi. Saya masih bisa tidur normal (6-9 jam per hari), bahkan di malam menjelang ujian pre-defense (1 Desember 2020) dan final defense (2 Februari 2021). 

Data detak jantung (heartrate, beat per minutes [bpm])

Mean				65.1039860577353
Standard Error			0.044167266977505
Mode				75
Median				63
First Quartile			57
Third Quartile			74
Variance			87.307653868568
Standard Deviation		9.34385647731
Kurtosis			1.00227156060073
Skewness			0.877115460025224
Range				101
Minimum				40
Maximum				141
Sum				2913794
Count				44756

Data detak Jantung tidak menunjukkan perubahan yang berarti. Saya juga kesulitan untuk menginterpretasikan data di atas. Kedepannya, mungkin hanya data langkah kaki dan waktu tidur yang dijadikan rujukan utama untuk memvisualisasikan pola hidup.

Penutup

Tujuan utama visualisasi data jalan kaki, tidur, dan detak jantung ini adalah untuk mengetahui pola hidup saya di akhir studi S3. Saya ingin membandingkan data saat sekolah tersebut dan data saat mulai bekerja (April 2021). Data selanjutnya akan dipublikasikan juga jika memungkinkan.

Wednesday, May 26, 2021

Menyalin teks dari Screenshot

Untuk menyalin teks dari sceenshot, gunakan normcap. Langkah-langkahnya (Ubuntu 20.04): 
  1. Install library yang dibutuhkan
  2. sudo apt-get install tesseract-ocr xclip python3-dev python3-tk python3-pil.imagetk libleptonica-dev libtesseract-dev libnotify-bin build-essential 
  3. Install normcap via pip
  4.  pip3 install normcap
  5. Panggil normcap dari terminal
     normcap

Berikut demonya.


Catatan untuk Ubuntu 16.04

Langkah di atas hanya bekerja pada Ubuntu 20.04 dengan Python 3.8. Untuk Ubuntu 16.04, anda harus menginstall tesseract-ocr (engine pengenalan teks) terbaru, yakni versi 4.1 via ppa. Program tesseract-ocr yang ada di repo 16.04 adalah versi lama (3.0.4) dan menyebabkan terjadinya error pada instalasi normcap di Ubuntu 16.04.

Ikuti langkah-langkah di sini untuk instalasi tesseract-ocr baru di Ubuntu 16.04. Meski sudah menginstall tesseract-ocr terbaru dan menambah data train (tessdata) di /usr/share/tesseract-ocr/tessdata/, saya masih gagal menginstall normcap di Ubuntu 16.04. Pesan errornya seperti ini.

...  
AttributeError: type object 'tesserocr.OEM' has no attribute 'LSTM_ONLY'
Catatan ini akan diupdate bila ada informasi baru.
Solusi:
Berdasarkan komentar pembuatnya, berikut solusi instalasi normcap di Ubuntu 16.04:
pip3.8 uninstall tesserocr
pip3.8 install --user normcap
Dan sekarang kita bisa menyalin teks dari gambar lewat screenshot di Ubuntu 16.04!

Tuesday, April 27, 2021

Perkalian waktu di Python

Ada kalanya kita ingin mengalikan waktu agar kita mengetahui jumlah jam yang kita gunakan untuk mengerjakan sesuatu, misalnya jam kerja. Dengan cara biasa, jam:detik tidak bisa dikalikan. Cara berikut dapat digunakan untuk mengetahui berapa lama kita seharusnya menggunakan waktu tersebut. Misalnya, jika perhari kita "hanya" dialokasikan waktu tujuh jam empat puluh lima menit (ditulis "7:45"), berapa waktu (lagi "jam:menit") yang boleh dan harus kita gunakan untuk berkerja?
import datetime

# waktu kerja per hari, 7 jam 45 menit
t1 = datetime.timedelta(hours=7, minutes=45) 

# waktu kerja sebulan, 21 hari
t2 = t1 * 21


# fungsi untuk konversi jam dan menit
def sec2hourmin(t2_datetime):
	hours seconds = divmod(t2_datetime.total_seconds(), 3600)
    minutes, x  = divmod(seconds, 60)
    return hours, minutes

print(sec2hourmin(t2))
Dengan cara ini, kita bisa mendapatkan jumlah jam yang harus kita kerjakan untuk mengerjakan sesuatu (kerja) dalam sebulan. Agar lebih elegan, teknik di atas dapat kita konversi menjadi skrip python dengan argumen jumah hari untuk menghasilkan output "jam:menit" perbulannya.
# function to calculate hours and minutes per month for work
# input argument: # days (integer)
# example python3 days_to_hours.py 21

import sys
import datetime

def days2hours(days):
    tpday = datetime.timedelta(hours=7, minutes=45)
    tpmonth = tpday * days
    hours, seconds = divmod(tpmonth.total_seconds(), 3600)
    minutes, x  = divmod(seconds, 60)
    return int(hours), int(minutes)

hours, minutes = days2hours(int(sys.argv[1])) 
print('{}:{}'.format(str(hours), str(minutes)))
Ketik skrip di atas di editor dan simpan sebagai day_to_hour.py. Cara menggunakan skrip di atas adalah sebagai berikut.
# Jika sebulan ada 21 hari kerja
$ python3 day_to_hour.py 21
162:45
Artinya, dalam bulan itu ada 21 hari kerja; kita hanya diperbolehkan dan diharuskan bekerja selama 162 jam dan 45 menit.

Monday, April 26, 2021

Running IPython in multiple GPUs

Here is a simple configuration to run IPython on different GPUs on a single PC.

1. Check available GPU in PC via terminal, "$ sudo lshw -C display"

Checking number of GPUs

2. Launch "$ CUDA_AVAILABLE_DEVICES=0 ipython3" to use IPython using first GPU

Set IPython to use the first GPU (on OS level)

3. Launch "$ CUDA_AVAILABLE_DEVICES=1 ipython" to use IPython using second GPU

Set IPython to use the second GPU

4. Check "$ nvidia-smi" to confirm both GPUs are running simultaneously

Output of nvidia-smi when two GPUs are used simultaneously

5. For comparison, here is the output of 2 GPUs used in IPython without commands above

IPython without configuration resulting two GPUs output

Ouput of nvidia-smi without configuration

It can be seen from both IPython outputs and nvidia-smi that the configuration works. Each IPython window outputted a single GPU, while without configuration (without adding "CUDA_VISIBLE_DEVICES=X") the output of IPython is two GPUs. Also, the nvidia-smi output shows two GPUs work simultaneously with the given configs, while without config it shows only one GPU is running (the consumed memory of the second GPU only 416MiB meaning idle condition).


Update  2021/05/13

I checked again today, the above-mentioned steps sometimes still failed to choose GPU on multiple GPUs. The following workaround works for me.

Choose GPU 0

import os
os.environ["CUDA_DEVICE_ORDER"]="PCI_BUS_ID"
os.environ["CUDA_VISIBLE_DEVICES"]="0"

# check with
import tensorflow as tf
tf.test.is_gpu_available()
The same steps apply to GPU 1. These steps also can be applied using the shell command "export".
export CUDA_DEVICE_ORDER="PCI_BUS_ID"
export CUDA_VISIBLE_DEVICES="1" 
Please be sure not to make typo (E.g, VISIBLE -> VISBLE), otherwise, the configuration won't work. There is no error message when we make string typos in a shell.

Wednesday, March 17, 2021

Configure java-11 for Ltex in VScode Ubuntu 16.04

As a scientist or researcher or a lecturer, writing paper in Latex is a must. To make it easy writing in Latex, I used VScode with Latex Workshop extension. For non native English speaker, there is another extension called ltex (based on "language tool") to check spelling and grammar. This is a perfect combination for writing paper in Latex: VScode+Latex Workshop+Ltex.

However, since I used Ubuntu 16.04 as my OS, there is a difficulty on installing the latest Ltex version (v9.0.0) in Ubuntu 16.04, which required java-11. Here, I documented my steps to tackle the problem.
  1. Download openjdk from this link: https://github.com/AdoptOpenJDK/openjdk11-binaries/releases/download/jdk-11.0.10%2B9/OpenJDK11U-jdk_x64_linux_hotspot_11.0.10_9.tar.gz
  2. Extract the downloaded file.
  3. Copy extracted file to /usr/local:  sudo cp -r jdk-11.0.10+9/ /usr/local
  4. Set ltex java path to: /usr/local/jdk-11.0.10+9
  5. Finish
The last step, step 4 (before finish), can be shown below.

Now Ltex is ready, as shown below. It checks your spelling and grammar errors aumatically, for free.


Another trick
I used another PC with also 16.04 version, but I don't need to follow these tricky steps with leaving "Ltex Java path" blank.

Friday, March 12, 2021

Pentingnya mengucapkan "Terima Kasih"

Hari ini saya mendapat komplain dari guru bahasa Jepang saya. Seorang teman, ketika membalas email, tidak mengucapkan terima kasih. Padahal guru saya tersebut sudah mau mengajarinya bahasa Jepang, tanpa dibayar. Sensei berkata, impresinya terhadap teman saya ini kurang baik. Beliau bahkan menanyakan apa dia (teman saya tersebut) orang baik. Saya jawab tidak tahu, hanya kenal saja.

Dari sini saya belajar pentingnya mengucapkan terima kasih. Dalam kultur Jepang, ucapan terima kasih ini sangat penting dan sudah membudaya. Bahkan mereka mengatakannya dua kali untuk hal yang sama. Pertama saat ketika selesai ditolong. Kedua saat bertemu lagi, biasanya keesokan harinya atau di lain waktu.

Saya kemudian mengevaluasi diri, apakah saya sudah cukup mengatakan terima kasih. Kadang saya suka terlambat membalas email dari sensei, sampai sensei mengemail lagi apakah telah menerima email sebelumnya. Meski hanya email singkat, seperti "Terima kasih atas emailnya", hal ini sangat berarti. Untuk keharmonisan hubungan guru-murid dan teman kerja, di Jepang ucapan terima kasih merupakan hal yang dijunjung tinggi dan tidak boleh dilupakan.

Pun ketika kita membayar untuk sebuah jasa. Misal ketika naik angkutan umum, saya biasakan (dan memang itu biasa di Jepang) mengucapkan terima kasih (kepada sopir) saat turun dari angkutan tersebut. Terlebih ketika angkutan tersebut gratis. Juga ketika membeli sesuatu di toko, jangan lupa bilang terima kasih pada kasirnya. Kalau saat ditolong seseorang, ucapan terima kasih ini tak boleh lupa, seperti contoh curhatan sensei (guru) saya di atas. Berterima kasih dua kali juga lebih etis ketika kita mendapatkan pertolongan.

Syariatnya, kita berterima kasih kepada manusia. Hakikatnya, kita berterima kasih pada Tuhan, Allah SWT, Tuhan Semesta Alam.

Wednesday, March 10, 2021

Tricks for obtaining Researcher visa while not yet holding PhD certificate

I think this note is important. That's why I shared it here.

For a graduate student (Ph.D.) in Japan who found a researcher position in a research institute (or company), there is a trick to change the visa smoothly. First, here is a list of necessary documents to change the status of residence:

  • Application form 1 copy
  • Photo (4cm×3cm) 1 copy
    • If the applicant wishes to change his/her current status to a status of residence which does not come under that for a mid to long-term resident (a photo is also not required for persons under the age of 16 years).
    • A photo that shows the applicant pictured alone.
    • The applicant should face squarely to the front and should remove any hats, caps, or head coverings.
    • There should be a plain background with no shadows.
    • The photo must be sharp and clear.
    • The photo must have been taken within three months prior to submission.
  • The supporting documents to be submitted on the occasion of application are shown in Table 3 (As the applicant sometimes needs to submit document material(s) other than stipulated in the Immigration Control Act Enforcement Regulations, please refer to your regional immigration office or immigration information center.)
  • Passport and residence card (or alien registration certificate deemed equivalent to a residence card)
  • A document that proves the status (if a legal representative or agent submits the application form on behalf of the applicant)
In principle, documents and materials which have been submitted will NOT be returned to you. If you have submitted any original copies of documents and materials, which would be difficult for you to re-obtain and would like to have them returned to you, please notify them when you file your application.

In my case, I was asked to submit a degree of certificate (Ph.D.). Because I have not graduated from university yet (planned for the end of March in Japan), hence it is difficult to show the certificate. The certificate of completion expectation didn't work. It will cause trouble if I wait to use the original certificate of my Ph.D. study.

I googled on the previous day before I went to the immigration office to look solution. As listed here, there are three conditions to meet the researcher's visa application.


Luckily, I brought the original certificate of my master's degree and showed it to the immigration officer. They accepted it. That is the trick, use a master's degree certificate instead of a Ph.D. certificate. The Ph.D. (expectation) certificate is necessary for the employer but unnecessary for the immigration office. The master's degree certificate is enough.
Related Posts Plugin for WordPress, Blogger...